🥐 Ultimate Vanilla Custard Cinnamon Rolls (Bakery-Style Recipe)
There is nothing quite like the aroma of fresh cinnamon rolls wafting through the house on a cozy morning. But if you think regular cinnamon rolls are elite, prepare to have your mind blown.
Introducing the Vanilla Custard Cinnamon Roll.
Imagine the softest, fluffiest, cloud-like dough wrapped around a rich, velvety vanilla custard filling, kissed with classic brown sugar and cinnamon, and topped off with a silky, translucent bakery glaze. It’s the ultimate mashup between a classic gooey cinnamon roll and a decadent Boston cream donut.
Whether you are a seasoned baker looking to level up your weekend brunch or a beginner wanting to impress your friends, this step-by-step guide will help you achieve bakery-quality results right in your own kitchen.
🧐 Why This Recipe Works
Most cinnamon rolls rely solely on butter and brown sugar for their filling. While delicious, that mixture can sometimes melt completely out of the roll during baking, leaving the center dry.
By introducing vanilla custard into the mix, we create a moisture barrier. The custard bakes into the dough layers, creating an unbelievably soft, pudding-like center that stays gooey for days.
- The Dough: A enriched, high-moisture dough that yields a pillowy-soft texture.
- The Filling: A perfect balance of creamy, rich vanilla and warm, spiced cinnamon sugar.
- The Glaze: A simple, sweet, and silky vanilla drizzle that ties it all together without overpowering the pastry.
🛒 Ingredients Checklist
Before you tie on your apron, let’s gather the ingredients. You don’t need anything fancy for this recipe—just standard pantry staples and a little bit of patience.
🍞 For the Dough
- 2 cups All-Purpose Flour: Provides the perfect structure and chew.
- 2 tbsp Granulated Sugar: Feeds the yeast and adds a subtle sweetness to the dough.
- 1 tsp Instant Yeast: For a quick, reliable rise.
- 1/2 cup Warm Milk: (Around 43°C/110°F) activates the yeast and softens the crumb.
- 1 Egg: Adds richness, structure, and color to the dough.
- 3 tbsp Unsalted Butter: (Softened or melted and cooled) makes the dough tender and melt-in-your-mouth soft.
🍮 For the Filling
- 1 cup Vanilla Custard: You can use thick, cooled homemade pastry cream or a high-quality store-bought custard.
- 2 tbsp Brown Sugar: Adds that classic molasses sweetness.
- 1 tsp Ground Cinnamon: For that quintessential warm spice flavor.
💧 For the Glaze
- 1/2 cup Powdered Sugar: The base for a smooth, lump-free glaze.
- 2 tbsp Milk: To thin out the sugar into a pourable consistency.
- 1 tsp Vanilla Extract: Adds a final punch of aromatic vanilla flavor.
⚖️ Ingredient Substitutions & Variations
Want to customize your rolls? Here are a few expert-approved swaps:
- The Flour: You can swap the all-purpose flour for bread flour if you prefer a chewier, more structural roll.
- The Yeast: If using Active Dry Yeast instead of Instant, mix it into the warm milk with a pinch of the sugar and let it sit for 5–10 minutes until foamy before adding the rest of the ingredients.
- The Custard: Short on time? Standard vanilla pudding mix (made slightly thicker than package instructions) works in a pinch, though real custard yields the richest flavor.
- Add-ins: Feel free to sprinkle chopped pecans or raisins over the custard layer before rolling for added texture!
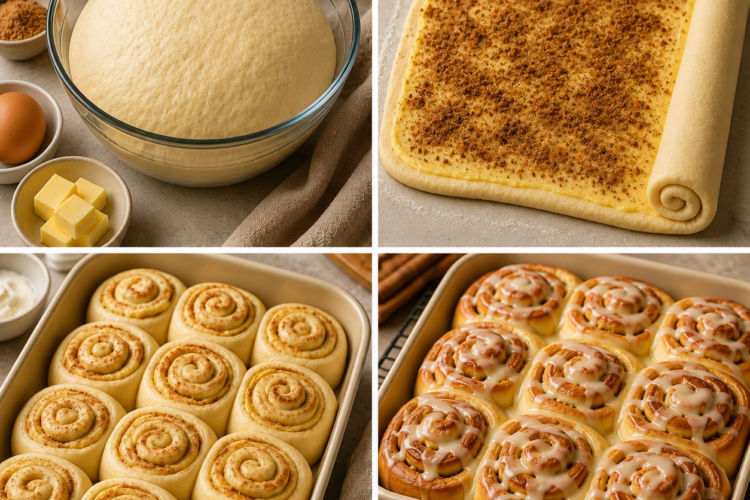
👩🍳 Step-by-Step Instructions
Follow these steps precisely, and you’ll be rewarded with the most spectacular cinnamon rolls you’ve ever tasted.
🥣 Step 1: Mix and Knead the Dough
- In a large mixing bowl (or the bowl of a stand mixer fitted with a dough hook), combine the 2 cups of flour, 2 tablespoons of sugar, and 1 teaspoon of instant yeast.
- Pour in the 1/2 cup of warm milk, the egg, and the 3 tablespoons of softened butter.
- Stir until a shaggy dough begins to form.
- Turn the dough out onto a lightly floured surface and knead for 5–7 minutes, or mix on medium-low speed in your stand mixer. The dough is ready when it is smooth, slightly tacky but not sticky, and springs back when gently poked.
🌬️ Step 2: The First Rise
- Form the dough into a smooth ball.
- Lightly grease a clean bowl with a drop of oil or butter.
- Place the dough inside, cover the bowl with a damp cloth or plastic wrap, and set it in a warm, draft-free spot.
- Let it rise for 1 hour, or until it has doubled in size.
Pro Tip: If your kitchen is cold, turn your oven on to 35°C (100°F) for one minute, turn it off, and place the covered bowl inside. It creates the perfect proofing box!
📐 Step 3: Roll and Fill
- Once the dough has doubled, punch it down gently to release the air bubbles.
- Dust your clean countertop with a little flour.
- Using a rolling pin, roll the dough out into a neat rectangle, roughly 12×8 inches in size, keeping the thickness as uniform as possible.
- Spread the 1 cup of vanilla custard evenly across the surface of the dough, leaving a 1/2-inch border along the edges.
- In a small bowl, mix the 2 tablespoons of brown sugar and 1 teaspoon of cinnamon. Sprinkle this mixture evenly over the top of the custard.
+-----------------------------------+
|      1/2-inch Clean Border        |
|  ===============================  |
|  |     Vanilla Custard Layer   |  |
|  |              +              |  |
|  |    Cinnamon-Sugar Dust      |  |
|  ===============================  |
+-----------------------------------+
🌀 Step 4: Roll and Cut
- Starting from the long edge closest to you, roll the dough up tightly into a log. Try to keep it snug so the filling doesn’t leak out, but don’t pull so hard that you tear the dough.
- Once rolled, pinch the seam closed.
- Using a sharp serrated knife or a piece of unflavored dental floss, cut the log into equal slices (about 6 to 8 rolls depending on how thick you want them).
⏰ Step 5: The Second Rise
- Lightly grease an 8-inch or 9-inch baking dish with butter or cooking spray.
- Arrange the cut rolls in the dish, leaving a little bit of space between each one to allow room for growth.
- Cover the dish with a clean kitchen towel and let them rise a second time for 20 minutes. They should look puffy and be touching each other.
🔥 Step 6: Bake to Golden Perfection
- While the rolls are completing their second rise, preheat your oven to 180°C.
- Once the 20 minutes are up, uncover the rolls and place them into the center rack of the oven.
- Bake for 20–25 minutes. Keep an eye on them—they are done when the tops are a beautiful light golden brown and the custard in the center is bubbling gently.
🍯 Step 7: Glaze and Serve
- While the rolls are baking, whisk together the 1/2 cup of powdered sugar, 2 tablespoons of milk, and 1 teaspoon of vanilla extract in a small bowl until completely smooth and silky.
- Remove the cinnamon rolls from the oven.
- While they are still warm, drizzle the glaze generously over the top. The warmth of the rolls will melt the glaze slightly, allowing it to seep into all the nooks and crannies.
- Let them cool for 5 minutes, then serve warm!
🛠️ Essential Baking Equipment
Having the right tools makes baking a stress-free experience. Here is what we recommend for this recipe:
| Tool | Purpose | Why It Matters |
|---|---|---|
| Baking Dish | 8 or 9-inch Ceramic/Glass | Distributes heat evenly for a soft bake. |
| Rolling Pin | Classic Wooden or Silicon | Helps get a uniform rectangle shape. |
| Kitchen Scale | Measuring ingredients | Ensures accuracy, which is vital for perfect dough. |
| Unflavored Floss | Cutting the dough log | Slices cleanly through the dough without squishing the layers. |
💡 Expert Tips for the Best Cinnamon Rolls
To ensure your vanilla custard cinnamon rolls come out looking like they belong in a gourmet bakery window, keep these insider tips in mind:
1. Don’t Over-Heat the Milk
Yeast is a living organism. If your milk is too hot (above 48°C/120°F), it will kill the yeast, and your dough will never rise. Aim for a comfortable “baby bathwater” warmth.
2. The Floss Trick for Clean Cuts
Using a knife to cut raw, filled dough can often squish the rolls into sad ovals and force the custard out the sides. Instead, slide a piece of unflavored dental floss under the log, cross the ends over the top, and pull tightly. It cuts through the dough perfectly without deforming it.
3. Use Thick Custard
If your vanilla custard is too runny, it will leak out everywhere when you attempt to roll and slice the dough. Ensure your custard is thoroughly chilled and has a spreadable, pudding-like consistency before using it.
📋 Troubleshooting Common Mistakes
- My dough didn’t rise!
- Likely Cause: Your milk was too hot, your yeast was old/expired, or your kitchen is too cold. Double-check expiration dates and try a warmer proofing environment.
- The custard leaked out everywhere during baking.
- Likely Cause: The log wasn’t rolled tightly enough, or the custard used was too thin. Don’t worry—it will still taste caramelized and delicious!
- The rolls are hard/dry.
- Likely Cause: Too much flour was added during the mixing phase, or they were over-baked. Always measure your flour carefully (fluff, spoon, and level if using cups).
🌡️ Storage, Freezing, and Reheating Guide
Cinnamon rolls are best fresh out of the oven, but if you have leftovers, they can easily be preserved!
🛍️ How to Store
Keep leftover rolls in an airtight container at room temperature for up to 2 days. Because of the dairy content in the custard, if you plan to keep them longer, store them in the refrigerator for up to 5 days.
🧊 How to Freeze
- Before Baking: Assemble the rolls in the baking dish after cutting them, but before the second rise. Wrap the dish tightly in plastic wrap and aluminum foil, and freeze for up to 1 month. To bake, thaw in the fridge overnight, let them sit at room temperature for 30 minutes to puff up, then bake as directed.
- After Baking: Allow the baked, unglazed rolls to cool completely. Wrap them individually in plastic wrap and freeze. When a craving strikes, thaw one out and pop it in the oven or microwave.
♨️ How to Reheat
To bring back that fresh-out-of-the-oven magic, microwave a single roll on medium power for 15–20 seconds. Alternatively, place them in a 150°C oven for 5–7 minutes until warmed through. Add fresh glaze if desired!
❓ Frequently Asked Questions (FAQs)
Can I make these overnight?
Yes! You can assemble the rolls, place them in the baking dish, cover them tightly, and put them straight into the refrigerator overnight for their second rise. In the morning, bring them out to room temperature for about 30–45 minutes while your oven preheats, then bake normally.
What kind of custard should I use?
You can use standard vanilla pastry cream, store-bought vanilla custard, or thick instant vanilla pudding. Just make sure it is thick enough to hold its shape when spread onto the dough.
Why do my cinnamon rolls turn out doughy in the center?
If the exterior is golden but the interior is raw, your oven might be running too hot, causing the outside to cook faster than the inside. You can tent a piece of aluminum foil over the top of the dish during the last 10 minutes of baking to prevent over-browning while the center finishes cooking.
🍽️ The Ultimate Recipe Card
Ready to get baking? Print or screenshot this card to guide you through the process.
Recipe: Bakery-Style Vanilla Custard Cinnamon Rolls
Prep Time: 1 hour 30 mins | Cook Time: 25 mins | Yield: 6-8 rolls

INGREDIENTS:
Dough: 2 cups flour, 2 tbsp sugar, 1 tsp instant yeast, 1/2 cup warm milk, 1 egg, 3 tbsp butter.
Filling: 1 cup vanilla custard, 2 tbsp brown sugar, 1 tsp cinnamon.
Glaze: 1/2 cup powdered sugar, 2 tbsp milk, 1 tsp vanilla.

INSTRUCTIONS:
1. MIX ingredients to form a soft dough. Knead until smooth.
2. RISE in a warm spot for 1 hour until doubled.
3. ROLL dough into an 12x8 inch rectangle on a floured surface.
4. SPREAD custard smoothly, then dust with brown sugar & cinnamon.
5. ROLL tightly into a log, slice into individual rounds, and place in a greased pan.
6. RISE for 20 minutes covered.
7. BAKE at 180°C for 20-25 mins until golden brown.
8. DRIZZLE with whisked glaze ingredients while warm. Serve immediately!
Enjoy every single creamy, comforting, spiced bite of these homemade treats!