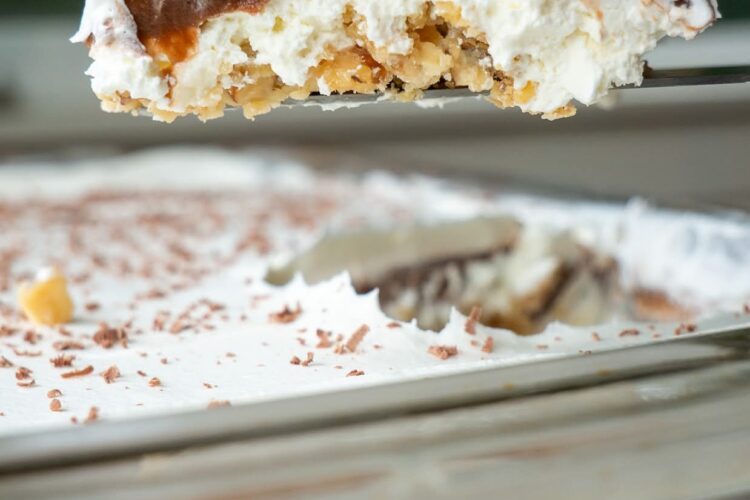
🍰 Robert Redford Dessert (Better Than Sex Cake) – The Ultimate Layered Dessert Recipe
If you’re looking for a show-stopping dessert that’s rich, creamy, crunchy, and completely irresistible, you’ve just found it. The famous Robert Redford Dessert—often nicknamed “Better Than Sex Dessert”—is a nostalgic, crowd-pleasing treat that layers buttery crust, fluffy cream cheese filling, silky pudding, and whipped topping into one unforgettable bite.
Whether you’re preparing for a family gathering, holiday table, or simply craving something indulgent, this recipe delivers every single time. Plus, it’s surprisingly easy to make with simple ingredients you probably already have in your kitchen.
Let’s dive into the magic behind this legendary dessert 👇
🧾 Ingredients You’ll Need
Here’s everything required to create this luscious layered dessert:
- 1 cup all-purpose flour
- 3/4 cup unsalted butter, chopped
- 1 cup finely chopped walnuts
- 8 oz cream cheese (softened)
- 1 cup powdered sugar
- 2 (8 oz each) containers frozen whipped topping, thawed
- 1 (5.1 oz) package instant chocolate pudding mix
- 1 (5.1 oz) package instant vanilla pudding mix
- 3 cups milk
- 1/8 cup semisweet chocolate, grated
🍽️ What Is Robert Redford Dessert?
This dessert is a classic layered pudding dessert that became popular in American kitchens decades ago. Despite its glamorous name, it has nothing to do with the actor—it’s simply so good that people jokingly named it after a Hollywood heartthrob.
It’s made up of four dreamy layers:
- Buttery walnut crust
- Sweet cream cheese filling
- Chocolate + vanilla pudding layer
- Fluffy whipped topping with chocolate garnish
Each bite combines crunch, creaminess, and sweetness in perfect harmony.
👩🍳 Step-by-Step Instructions
Follow these simple steps to achieve dessert perfection:
🥧 Step 1: Prepare the Crust
- Preheat your oven to 350°F (175°C)
- In a bowl, mix flour, chopped butter, and walnuts
- Use a fork or pastry cutter until crumbly
- Press evenly into a 9×13-inch baking dish
Bake for 15–20 minutes or until lightly golden. Let it cool completely.
🧀 Step 2: Make the Cream Cheese Layer
- Beat softened cream cheese until smooth
- Add powdered sugar and mix well
- Fold in 1 container of whipped topping
Spread this mixture evenly over the cooled crust.
🍫 Step 3: Prepare the Pudding Layer
- In a bowl, whisk together:
- Chocolate pudding mix
- Vanilla pudding mix
- Milk
Mix until thickened (about 2–3 minutes).
Spread this pudding mixture over the cream cheese layer.
☁️ Step 4: Add the Final Topping
- Spread the remaining whipped topping evenly over the pudding layer
- Sprinkle grated chocolate on top for a beautiful finish
❄️ Step 5: Chill Before Serving
Refrigerate for at least 4 hours (overnight is even better).
This allows the layers to set and flavors to meld perfectly.
😍 Why You’ll Love This Dessert
There’s a reason this recipe has stood the test of time:
- ✔️ No complicated techniques
- ✔️ Perfect make-ahead dessert
- ✔️ Rich, creamy, and satisfying
- ✔️ Ideal for parties and potlucks
- ✔️ Customizable with different flavors
It’s one of those desserts people always ask for the recipe after trying.
🔄 Variations & Flavor Twists
Want to switch things up? Try these delicious variations:
🍓 Fruity Version
Swap pudding layers for strawberry or banana pudding and add fresh fruit slices.
🍪 Cookie Crust
Replace the walnut crust with crushed graham crackers or Oreos for a different texture.
🥜 Nut-Free Option
Skip walnuts and use a simple buttery crust instead.
🍫 Extra Chocolate Lover’s Version
Add chocolate chips or drizzle melted chocolate between layers.
💡 Pro Tips for the Best Results
Make your dessert absolutely flawless with these tips:
- 🧈 Use softened cream cheese for a smooth layer
- ❄️ Chill long enough—this is key for clean slices
- 🥄 Spread layers gently to keep them distinct
- 🥛 Use cold milk for quicker pudding thickening
- 🔪 Cut with a clean knife for neat presentation
🥗 Storage & Make-Ahead Tips
This dessert is perfect for prepping ahead of time.
🧊 Refrigeration
- Store covered in the fridge for up to 4 days
❄️ Freezing
- Can be frozen, but texture may slightly change
- Thaw in fridge before serving
⏱️ Make Ahead
- Best made 1 day in advance for optimal flavor
🍴 Serving Suggestions
Take your presentation to the next level:
- Serve chilled with extra chocolate shavings 🍫
- Add a drizzle of chocolate or caramel sauce
- Pair with coffee or espresso ☕
- Top with toasted nuts for extra crunch
❓ Frequently Asked Questions
Can I use homemade whipped cream instead?
Yes! Substitute whipped topping with freshly whipped cream for a more natural taste.
Can I make this gluten-free?
Absolutely—just use gluten-free flour for the crust.
Why is my dessert runny?
It likely needs more chilling time. Always allow at least 4 hours.
Can I use only one pudding flavor?
Yes, but the chocolate + vanilla combo gives the best balance.
🧡 The Secret Behind Its Popularity
This dessert has become a staple because it hits every craving at once:
- Sweet ✔️
- Creamy ✔️
- Crunchy ✔️
- Chocolatey ✔️
It’s comfort food at its finest—simple, nostalgic, and incredibly satisfying.
🎉 Final Thoughts
The Robert Redford Dessert is more than just a recipe—it’s an experience. From its buttery crust to its creamy layers and chocolate topping, every bite feels indulgent and comforting.
Whether you’re making it for a celebration or just to treat yourself, this dessert is guaranteed to impress. And the best part? It’s easy enough for beginners but delicious enough to rival any bakery creation.
So go ahead—grab your ingredients, layer it up, and enjoy one of the most beloved desserts of all time.