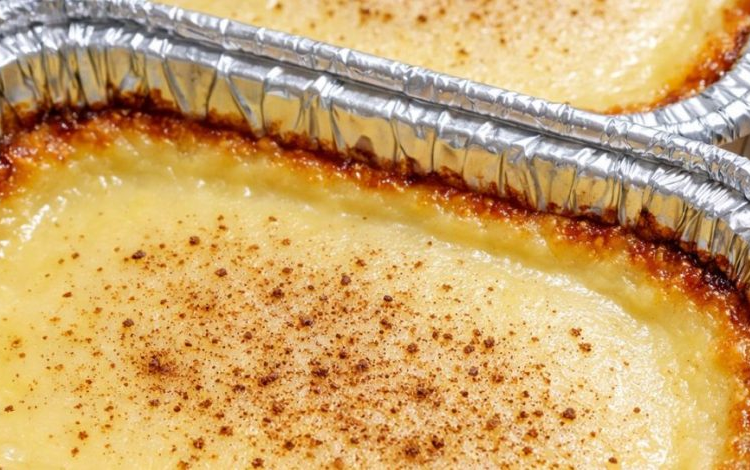
🍮 Ultra-Creamy 3-Ingredient Baked Egg Custard (Low-Carb & Sugar-Free)
Finding a dessert that feels incredibly indulgent while keeping your health goals on track can feel like a massive challenge. Most traditional comfort foods are loaded with processed sugars and refined flours that send your blood sugar on a roller coaster.
But what if you could make a velvety, rich, comforting dessert using only three everyday ingredients?
This 3-Ingredient Baked Egg Custard is the ultimate kitchen hack for anyone on a low-carb, keto, or sugar-free diet—or simply anyone who loves classic, nostalgic desserts. It requires no complicated baking skills, no hard-to-find ingredients, and less than ten minutes of hands-on prep time. By combining fresh eggs, luscious heavy whipping cream, and your favorite sugar substitute, you create a silky-smooth custard that rivals any high-end restaurant version.
Let’s dive deep into why this recipe works, the science behind perfect custard texture, how to choose your ingredients, and a step-by-step breakdown to ensure your baking is completely foolproof.
🍯 Why This 3-Ingredient Baked Custard Dominates Google Search
When you are looking for a recipe online, you want something that delivers maximum flavor with minimum effort. This low-carb baked egg custard checks every single box.
- Ultimate Simplicity: With only 3 core ingredients, you do not have to spend a fortune at the grocery store or hours prepping in the kitchen.
- Keto and Diabetic-Friendly: By replacing traditional sugar with a high-quality granular sweetener, this recipe keeps your insulin levels stable and fits perfectly into a low-carbohydrate lifestyle.
- Nutrient-Dense Satisfaction: Packed with healthy fats from heavy cream and bioavailable protein from fresh eggs, a small serving of this custard keeps you feeling genuinely full and satisfied, completely crushing late-night sweet cravings.
- Nostalgic Comfort Food: This recipe delivers that exact, warm, vanilla-flecked, nutmeg-dusted comfort flavor that reminds you of childhood desserts baked by grandparents.
🥚 The Simple 3-Ingredient Lineup
The beauty of a minimalist recipe is that every single ingredient has a major job to do. Because there are no fillers, starches, or artificial thickeners, the quality and proportions of these three items will determine the final texture of your dessert.
1. Fresh Large Eggs
Eggs are the absolute backbone of any true custard. Unlike puddings, which rely on cornstarch or flour for thickening, a classic baked custard relies entirely on the coagulation of egg proteins to trap liquid and form a delicate, sliceable gel.
- The Science: When heated gently, the proteins in the egg whites and yolks unwind and bond together, creating a microscopic mesh framework that holds the heavy cream in place.
- Pro Tip: Use fresh, room-temperature eggs. Room-temperature eggs blend much more smoothly with the cream, preventing pockets of unmixed egg white from creating rubbery bits in your finished dessert.
2. Pure Heavy Whipping Cream
Traditional custards often use whole milk or half-and-half. However, to achieve an unparalleled mouthfeel while keeping the net carb count incredibly low, we are using 100% heavy whipping cream.
- The Richness Factor: Heavy cream contains roughly 36% to 40% milk fat. This high fat content does two things: it provides a luxurious texture that coats your spoon, and it acts as a buffer against overheating, making it much harder to accidentally scramble your eggs during the baking process.
- Carb Control: Whole milk contains a significant amount of lactose (natural milk sugar). Heavy cream strips away most of that liquid whey, giving you all the rich dairy flavor with only a fraction of the carbohydrates.
3. Granular Low-Carb Sweetener
To make this dessert completely sugar-free, a granular low-carb sweetener is essential.
- Erythritol & Monk Fruit Blends: An erythritol-monk fruit blend is highly recommended for this recipe. Erythritol provides the bulk and clean sweetness, while a touch of monk fruit offsets any potential cooling sensation.
- Allulose Alternative: If you prefer an even softer, ultra-smooth texture without any risk of crystallization when the custard cools, allulose is a fantastic 1:1 substitute. It behaves almost identically to real sugar and dissolves effortlessly into the cream.
- The Measurement: We start with 1/3 cup, which yields a mild, balanced sweetness. If you have a profound sweet tooth, you can easily increase this to 1/2 cup without altering the structural integrity of the custard.
🍳 The Optional (But Highly Recommended) Topping: Ground Nutmeg
While not counted in the core three ingredients, a light dusting of freshly grated ground nutmeg is the signature hallmark of a traditional baked custard. It cuts through the intense richness of the heavy cream and eggs, providing a warm, aromatic spiced note that ties the entire dish together.
🥣 Step-by-Step Instructions: How to Bake the Perfect Custard
Baking a custard is not difficult, but it does require a gentle touch. Follow these steps precisely to ensure your custard turns out silky-smooth, without any watery separation or rubbery edges.
📋 Equipment Needed
- Mixing bowl
- Whisk or immersion blender
- Fine-mesh strainer (optional, for the ultimate smooth texture)
- Four 6-ounce ceramic ramekins (or one medium baking dish)
- A large, deep baking pan (such as a 9×13-inch cake pan) to act as your water bath
🛠️ The Recipe Method
- Prep Your Oven and Ramekins
Oven Temp: 325°F (163°C)
Preheat your oven to 325°F (163°C). Arrange four 6-ounce ceramic ramekins inside a larger, deep baking pan. Set a kettle of water on the stove to heat up; you will need this hot water later for the water bath. - Whisk the Base Ingredients
Do not over-mix
In a medium mixing bowl, crack the 4 large eggs. Add 1/3 cup of your granular low-carb sweetener. Whisk the eggs and sweetener together until the granules begin to dissolve and the mixture is uniform. Pour in the 2 cups of heavy whipping cream and whisk gently until completely combined.
Note: Avoid whipping too vigorously. Whipping introduces excessive air bubbles, which can cause your custard to puff up in the oven and collapse into a spongy, porous texture rather than staying dense and smooth. - Strain and Pour
Optional for a silky finish
For a truly professional, restaurant-quality finish, pour the liquid custard mixture through a fine-mesh strainer into a large measuring cup or pitcher. This catches any stubborn strands of egg white (the chalazae) that didn’t fully break down. Divide the strained liquid evenly among the four ramekins. - The Nutmeg Dusting
Aromatic touch
Take your ground nutmeg and lightly dust the surface of each unbaked custard cup. The spice will float elegantly on top of the cream and bake into a beautiful, fragrant golden crust. - Set Up the Water Bath (Bain-Marie)
Crucial for even cooking
Carefully transfer the large baking pan containing the filled ramekins onto the middle rack of your preheated oven. Carefully pour the hot water from your kettle into the larger pan around the ramekins.
Ensure the water level reaches halfway up the sides of the ramekins. Be incredibly careful not to splash any water into the custard mixture itself. - Bake to Perfection
Time: 35 to 45 minutes
Bake at 325°F (163°C) for 35 to 45 minutes. Start checking them at the 35-minute mark.
You know they are done when the edges are completely set and firm to the touch, but the exact center still retains a slight, gelatinous jiggle when the pan is gently nudged. Do not wait for the center to become completely solid, or the custard will be overcooked by the time it cools. - Cool and Set
Chilling develops the texture
Carefully remove the ramekins from the hot water bath using tongs or oven mitts and set them on a wire cooling rack. Let them cool down completely to room temperature. Once cool, transfer them to the refrigerator to chill for at least 2 to 3 hours before serving. The texture will significantly firm up and become beautifully velvety as it sits in the cold.
🔬 The Science of the Water Bath: Why It Is Non-Negotiable
If there is one step that home bakers skip out of laziness, it is the water bath—scientifically known as a bain-marie. Skipping this step is the number one reason why custard recipes fail.
+-------------------------------------------------------+
|  Oven Air Temperature: 325°F (163°C)                  |
|                                                       |
|       +---------------------------------------+       |
|       | Hot Water Bath: Constrained to 212°F  |       |
|       |                                       |       |
|       |    +---------+         +---------+    |       |
|       |    | Custard |         | Custard |    |       |
|       |    |  Gently |         |  Gently |    |       |
|       |    | Cooking |         | Cooking |    |       |
|       |    +---------+         +---------+    |       |
|       +---------------------------------------+       |
+-------------------------------------------------------+
Egg proteins are highly sensitive to heat. Whole eggs begin to coagulate at roughly 145°F (63°C), and if they hit temperatures much higher than 180°F (82°C), the protein chains tighten up too aggressively. When this happens, they squeeze out the trapped liquid like a wrung-out sponge, leaving you with a watery pool at the bottom of the dish and a grainy, sulfurous texture that tastes like sweet scrambled eggs.
Water cannot exceed its boiling point of 212°F (100°C) at standard atmospheric pressure. By surrounding your delicate ceramic ramekins with water, you form a protective thermal shield. The temperature of the custard base can never spike rapidly, allowing the egg proteins to cook in a slow, uniform fashion. This gentle environment guarantees that your dessert keeps its signature, uniform creaminess from the very edge of the cup all the way to the absolute center.
💡 Troubleshooting & Essential Baking Tips
Even with a simple recipe, minor variables like oven accuracy or ramekin thickness can change your results. Here is how to navigate common custard issues like an expert pastry chef.
🛑 How to Fix Common Custard Mistakes
- My custard looks curdled or watery: This is a clear sign of overbaking or an oven running too hot. Next time, calibrate your oven with a standalone thermometer, reduce the baking time by 5 minutes, or pull the custards out when the center looks slightly more liquid than you think it should.
- The top of my custard has a rubbery skin: This happens if the top surface dries out too quickly from direct oven air. To prevent this, ensure your water bath water is hot when it goes into the oven, or loosely drape a sheet of aluminum foil over the top of the entire baking pan to trap steam.
- The sweetener settled to the bottom of the cup: Some granular sweeteners (especially pure erythritol) do not dissolve as efficiently in cold fat as they do in water. To completely prevent this, gently warm your heavy cream on the stovetop with the sweetener until it is entirely dissolved, let it cool down to room temperature, and then slowly whisk it into your eggs.
🥗 Nutritional Profiles & Health Benefits
This recipe is proof that you do not need to sacrifice metabolic health to enjoy an incredible dessert. Let’s look at how this profile breaks down for a single serving (assuming the recipe is divided into 4 generous 6-ounce ramekins).
📊 Macronutrient Breakdown (Per Serving)
| Metric | Amount | Daily Value % |
|---|---|---|
| Calories | 415 kcal | 21% |
| Total Fat | 42g | 54% |
| Saturated Fat | 26g | 130% |
| Cholesterol | 285mg | 95% |
| Sodium | 85mg | 4% |
| Total Carbohydrates | 3.5g | 1% |
| Dietary Fiber | 0g | 0% |
| Net Carbohydrates | 2.5g | — |
| Protein | 7.5g | 15% |
Note on Sweeteners: Sugar alcohols like erythritol or allulose are omitted from the net carbohydrate calculation because they pass through the human body without impacting blood glucose or adding caloric value.
🩺 Health Benefits of Low-Carb Egg Custard
- Zero Blood Sugar Spikes: Because there are no fast-acting sugars or starches, this dessert maintains highly stable blood glucose levels. It is an exceptional treat for individuals managing Type 2 diabetes or insulin resistance.
- Sustained Ketosis Support: Boasting an elite ketogenic macronutrient ratio (over 85% of total calories derived from clean fats), this custard provides your body with high-quality lipids to keep fat-burning pathways running smoothly.
- Choline and Micronutrient Rich: Eggs are nature’s multivitamin. By eating this custard, you get a substantial dose of choline (vital for brain health and cellular signaling), lutein and zeaxanthin (critical protective antioxidants for your vision), and highly bioavailable vitamins A, D, E, and B12.
🔄 Recipe Variations & Flavor Modifications
Once you master the base 3-ingredient technique, you can use it as a culinary canvas. By adding simple, sugar-free extracts or small lifestyle adjustments, you can completely reinvent this dessert weekly.
- The Classic Vanilla Bean Custard: Add 1 teaspoon of pure vanilla extract or the scraped seeds of half a fresh vanilla bean pod to the egg and cream mixture before whisking. The tiny black vanilla flecks will settle beautifully throughout the custard.
- Rich Espresso Custard: Dissolve 1 tablespoon of high-quality instant espresso powder into your heavy cream before mixing it with the eggs. This yields a deeply aromatic, coffee-infused dessert that pairs perfectly with a shaving of sugar-free dark chocolate.
- Dairy-Free Alternative: If you cannot tolerate heavy dairy cream, replace the 2 cups of heavy whipping cream with an equal amount of full-fat canned coconut cream. Make sure to shake the can vigorously before measuring. The natural fats in the coconut mimic dairy cream beautifully, yielding an exotic, tropical twist on the classic custard.
- Warm Cinnamon & Chai Spice: Instead of standard nutmeg, whisk a half teaspoon of ground Ceylon cinnamon, a pinch of ground cardamom, and a touch of ginger powder directly into the liquid base. This fills your entire kitchen with an incredible, cozy autumn aroma while it bakes.
🥡 Storage & Meal Prep Guidelines
This baked custard is an outstanding candidate for batch cooking and weekend meal prep. It holds up beautifully in the cold, and many enthusiasts argue that the flavor profile deepens and improves after 24 hours of refrigeration.
- Refrigeration: Once your ramekins have cooled completely to room temperature, wrap the tops tightly with plastic wrap or aluminum foil to prevent them from absorbing any unwanted odors from your fridge. They will keep perfectly for up to 5 days.
- Serving Temperature: While delicious straight from the cold fridge, allowing the custard to sit on the counter for 10 to 15 minutes before eating softens the dairy fats slightly, unlocking an even creamier texture. Alternatively, you can eat them warm right out of the oven if you prefer a comforting, soufflé-like experience.
- Can you freeze baked custard? No. Freezing is highly discouraged for egg-and-cream based custards. The freezing process creates microscopic ice crystals that puncture the delicate protein mesh. When thawed, the structure completely collapses, causing the custard to break, weep liquid, and lose its iconic creaminess.
❓ Frequently Asked Questions (FAQ)
Can I use liquid sweeteners instead of granular ones?
Yes, you can use liquid stevia or liquid monk fruit drops, but you must be careful with proportions. Because liquid sweeteners are intensely concentrated, you only need a fraction of a teaspoon to match the sweetness of 1/3 cup of granular substitute. Keep in mind that missing the granular bulk will slightly reduce the total volume of your liquid base, but the custard will still set perfectly.
Why is my custard bubbling on the outside edges?
Bubbles around the perimeter of your ramekins indicate that the outer edges cooked too fast and began to boil. This is usually caused by either using boiling water instead of hot tap water in your water bath, or setting your oven temperature too high. To fix this, ensure your oven is truly at 325°F and tent the pan with foil to reflect harsh direct heat.
Can I bake this as one single large family-style dish instead of separate ramekins?
Absolutely. If you do not have individual ramekins, you can pour the entire strained custard mixture into an 8-inch ceramic or glass baking dish. Place that dish inside a larger pan with a water bath just like you would with the ramekins. Keep in mind that a large single dish will take longer to bake—expect it to take roughly 50 to 60 minutes to fully set in the center.
Is heavy cream better than half-and-half for this recipe?
For a low-carb or keto lifestyle, heavy cream is vastly superior. Half-and-half contains a higher ratio of milk to cream, which introduces more lactose (carbohydrates) and less fat. The lower fat content makes the custard less rich and increases the risk of overcooking the eggs. Stick with heavy whipping cream for that signature melt-in-your-mouth texture.
🖨️ Master Recipe Card (Printable)
Print this quick-reference card out or save it to your phone for seamless cooking access.
3-INGREDIENT BAKED EGG CUSTARD
Prep Time: 10 mins | Cook Time: 40 mins | Total Time: 50 mins
Yield: 4 Servings | Course: Dessert | Cuisine: American / British

INGREDIENTS:
- 4 large fresh eggs (room temperature)
- 2 cups heavy whipping cream
- 1/3 cup granular low-carb sweetener (erythritol, monk fruit, or allulose)
- Ground nutmeg (optional, for dusting)

DIRECTIONS:
1. Preheat your oven to 325°F (163°C). Place four 6oz ramekins inside a deep 9x13 baking pan.
2. In a bowl, whisk the eggs and low-carb sweetener until well combined.
3. Slowly pour in the heavy whipping cream while gently whisking to avoid creating air bubbles.
4. Strain the liquid through a fine-mesh sieve into a pitcher, then divide evenly among your ramekins.
5. Dust the tops with a light layer of ground nutmeg.
6. Place the baking pan into the oven and carefully pour hot water into the pan until it reaches halfway up the sides of the ramekins.
7. Bake for 35-45 minutes until the outer edges are stable and firm, but the center still has a slight wobble.
8. Remove from the water bath, cool to room temperature, and chill in the refrigerator for at least 2 hours before serving.
Give this recipe a try tonight, and witness how simple ingredients can transform into pure culinary elegance!