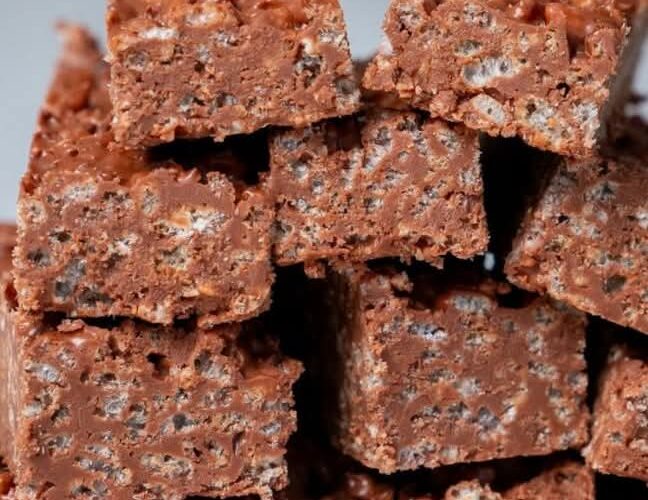
🍫 Homemade Crunch Bars – The Ultimate No-Bake Chocolate Peanut Butter Treat
There’s something magical about homemade desserts that combine rich chocolate, creamy peanut butter, and crispy crunch in every bite. If you’ve been searching for the perfect sweet snack that’s easy to make, incredibly satisfying, and guaranteed to impress your family and friends, these Homemade Crunch Bars are exactly what you need.
Made with just a handful of simple pantry ingredients, these no-bake crunch bars are loaded with crispy rice cereal, silky melted chocolate, creamy peanut butter, and buttery goodness. They’re quick enough for busy weekdays yet delicious enough for holidays, parties, bake sales, and special occasions.
The best part? You don’t need fancy equipment or baking skills to make them. Even beginners can whip up these chocolate crunch bars successfully on the first try.
Whether you’re craving a nostalgic childhood treat or looking for an easy dessert recipe to satisfy your sweet tooth, this recipe will become a favorite in your kitchen.
✨ Why You’ll Love These Homemade Crunch Bars
These bars are the perfect combination of crispy, creamy, sweet, and chocolatey. Here’s why everyone loves them:
- ✅ No baking required
- ✅ Ready with only 4 ingredients
- ✅ Rich chocolate peanut butter flavor
- ✅ Perfect balance of crunch and creaminess
- ✅ Great for parties and holiday trays
- ✅ Easy enough for kids to help make
- ✅ Stores beautifully in the fridge or freezer
- ✅ Better than store-bought candy bars
If you love classic chocolate crunch candy bars, this homemade version tastes even better because it’s fresher, richer, and customizable.
🥜 Ingredients for Homemade Crunch Bars
One of the best things about this recipe is how simple the ingredients are. You probably already have everything in your kitchen.
🍚 Rice Krispie Cereal – 5 Cups
Rice Krispies give these bars their signature crispy texture. They create the perfect light crunch that balances the rich chocolate mixture beautifully.
You can also use:
- Crispy rice cereal
- Brown rice cereal
- Gluten-free crispy cereal
🍫 Milk Chocolate Chips – 2 Cups
Milk chocolate creates a smooth, creamy sweetness that makes these bars irresistible.
For different flavor profiles, you can substitute:
- Semi-sweet chocolate chips
- Dark chocolate chips
- White chocolate chips
- Chocolate chunks
High-quality chocolate always gives the best flavor and texture.
🥜 Smooth Peanut Butter – 3/4 Cup
Peanut butter adds creamy richness and helps bind everything together.
Smooth peanut butter works best because it melts evenly and coats the cereal perfectly.
You can also try:
- Crunchy peanut butter
- Almond butter
- Cashew butter
- Sunflower seed butter
🧈 Butter – 1/4 Cup
Butter enhances the flavor and gives the bars a silky, melt-in-your-mouth texture.
Unsalted butter is preferred because it lets the sweetness shine without becoming overly salty.
🥣 Kitchen Tools You’ll Need
You don’t need much to make this easy dessert recipe.
Essential Equipment:
- Large mixing bowl
- Medium saucepan or microwave-safe bowl
- Rubber spatula
- 9×13-inch baking pan
- Parchment paper
- Measuring cups
👩🍳 How to Make Homemade Crunch Bars
These no-bake chocolate bars come together in just a few easy steps.
🔥 Step 1: Prepare Your Pan
Line a 9×13-inch baking pan with parchment paper.
This makes removing and slicing the bars much easier later.
Lightly grease the parchment if desired for extra easy removal.
🍫 Step 2: Melt the Chocolate Mixture
In a medium saucepan over low heat, combine:
- Milk chocolate chips
- Peanut butter
- Butter
Stir continuously until the mixture becomes smooth and glossy.
Be careful not to overheat the chocolate because it can seize or become grainy.
Microwave Method:
You can also microwave the ingredients in 30-second intervals, stirring between each interval until smooth.
🍚 Step 3: Add the Rice Krispies
Pour the rice cereal into a large mixing bowl.
Slowly pour the melted chocolate mixture over the cereal.
Gently fold everything together using a spatula until every piece of cereal is evenly coated.
Work carefully to avoid crushing the cereal too much.
🥄 Step 4: Press into the Pan
Transfer the mixture into your prepared baking pan.
Use a spatula or the back of a spoon to press it into an even layer.
Don’t press too firmly or the bars may become dense instead of crispy.
❄️ Step 5: Chill Until Firm
Place the pan in the refrigerator for about 1–2 hours.
Once fully set, lift the bars out using the parchment paper and slice into squares or rectangles.
🍽️ Step 6: Serve and Enjoy
Your homemade crunch bars are now ready to enjoy.
Serve chilled or at room temperature for the ultimate chocolatey crunch experience.
💡 Expert Tips for Perfect Crunch Bars
Even simple recipes can benefit from a few expert tricks.
🍫 Use Low Heat
Chocolate burns easily. Always melt slowly over low heat or use short microwave bursts.
🥄 Stir Constantly
Continuous stirring ensures the peanut butter and chocolate blend smoothly together.
🍚 Don’t Crush the Cereal
Fold gently to keep the cereal crispy and airy.
❄️ Chill Fully Before Cutting
This helps the bars hold their shape and creates cleaner slices.
🔪 Use a Warm Knife
Run your knife under hot water, dry it, and slice for smooth clean edges.
🍫 Delicious Variations to Try
One reason these bars are so popular is how customizable they are.
🍪 Cookies and Cream Crunch Bars
Add crushed chocolate sandwich cookies to the mixture for a cookies-and-cream twist.
🥨 Salty Pretzel Crunch Bars
Mix in crushed pretzels for sweet-and-salty perfection.
🥥 Coconut Chocolate Crunch Bars
Add shredded coconut for tropical flavor and texture.
🍯 Honey Peanut Crunch Bars
Drizzle honey into the melted mixture for extra sweetness and chewiness.
🌰 Nut Lover’s Crunch Bars
Mix in chopped peanuts, almonds, pecans, or walnuts.
🍬 Candy Explosion Bars
Add mini marshmallows, M&M’s, toffee bits, or chopped candy bars.
🍓 Fruity Crunch Bars
Add freeze-dried strawberries, raspberries, or bananas for a fruity crunch.
🎉 Perfect Occasions for Homemade Crunch Bars
These bars fit nearly every event imaginable.
🎂 Birthday Parties
Kids and adults both love them.
🎄 Holiday Dessert Trays
They look beautiful alongside cookies and brownies.
🏈 Game Day Snacks
Easy finger-food desserts are always a hit.
🧺 Picnics and Potlucks
These bars travel well and don’t crumble easily.
🎁 Homemade Food Gifts
Wrap them in decorative boxes or bags for thoughtful edible gifts.
🧊 How to Store Crunch Bars
Proper storage keeps them fresh and delicious.
🥶 Refrigerator Storage
Store in an airtight container in the fridge for up to 1 week.
Layer parchment paper between bars to prevent sticking.
❄️ Freezer Storage
Freeze for up to 3 months.
Wrap tightly in plastic wrap and place in freezer-safe containers.
Thaw in the refrigerator before serving.
🥛 What to Serve with Homemade Crunch Bars
These chocolate bars pair wonderfully with many drinks and desserts.
☕ Coffee
The rich bitterness of coffee balances the sweetness perfectly.
🥛 Cold Milk
A timeless combination everyone loves.
🍨 Vanilla Ice Cream
Serve bars alongside ice cream for an indulgent dessert.
🍓 Fresh Fruit
Strawberries, raspberries, and bananas pair beautifully with chocolate and peanut butter.
🧠 Why Homemade Desserts Taste Better
There’s a reason homemade treats are so comforting.
When you make desserts from scratch:
- You control the ingredients
- The flavors taste fresher
- There are fewer preservatives
- You can customize the sweetness
- The texture is better
- The experience feels more personal
Homemade crunch bars deliver everything people love about candy bars but with richer flavor and better texture.
🍫 The Secret Behind the Perfect Crunch
The magic of these bars comes from balancing textures.
The crispy cereal creates lightness while the peanut butter and chocolate add richness and creaminess.
That contrast makes every bite deeply satisfying.
The butter also helps create a softer melt that prevents the bars from becoming too hard in the refrigerator.
👨👩👧 Fun Recipe to Make with Kids
This is one of the best beginner-friendly dessert recipes.
Kids can help:
- Measure ingredients
- Stir the cereal
- Press the mixture into the pan
- Decorate the tops
Because there’s no baking involved, it’s safer and easier for little helpers.
🌟 Ways to Decorate Your Crunch Bars
Want bakery-style presentation? Try these ideas.
🍫 Chocolate Drizzle
Melt extra chocolate and drizzle over the top.
🌈 Sprinkles
Perfect for birthdays and celebrations.
🥜 Chopped Nuts
Add texture and visual appeal.
🍓 Freeze-Dried Fruit Crumbles
Adds color and flavor contrast.
✨ Sea Salt Flakes
A little sea salt makes the chocolate flavor pop.
🥗 Can You Make These Healthier?
Absolutely.
Try these swaps:
- Use dark chocolate instead of milk chocolate
- Reduce chocolate slightly
- Use natural peanut butter
- Choose low-sugar cereal
- Add chia seeds or flaxseed
You’ll still get delicious crunch and flavor with a slightly healthier twist.
⚠️ Common Mistakes to Avoid
Even easy recipes can go wrong if you’re not careful.
🔥 Overheating Chocolate
This creates a grainy or burnt texture.
🍚 Adding Too Much Cereal
Too much cereal makes dry bars that fall apart.
❄️ Not Chilling Long Enough
Warm bars won’t slice properly.
🥄 Pressing Too Hard
This removes the light crispy texture.
🍴 Nutritional Information (Approximate)
Per serving:
- Calories: 240
- Fat: 14g
- Carbohydrates: 24g
- Sugar: 16g
- Protein: 5g
Values vary depending on brands and portion size.
📜 The History of Chocolate Crunch Bars
Chocolate crunch bars have been loved for generations.
Classic candy companies popularized crispy chocolate bars in the early 20th century, combining puffed rice with milk chocolate for a unique crunchy texture.
Homemade versions later became popular because they were:
- Cheaper to make
- Easy to customize
- Perfect for feeding large groups
- Great for family baking traditions
Today, homemade crunch bars remain one of the most beloved no-bake dessert recipes worldwide.
❤️ Why This Recipe Always Works
This recipe succeeds because it uses a foolproof ratio of ingredients.
The chocolate mixture evenly coats the cereal while the peanut butter helps bind everything together.
The result is:
- Crispy but not dry
- Rich but not overly heavy
- Sweet but balanced
- Firm yet easy to bite
That perfect balance is what keeps people coming back for more.
🍫 Frequently Asked Questions
❓ Can I Use Crunchy Peanut Butter?
Yes. Crunchy peanut butter adds extra texture and nutty flavor.
❓ Can I Make These Dairy-Free?
Absolutely. Use:
- Dairy-free chocolate chips
- Vegan butter
The bars still turn out delicious.
❓ Can I Use White Chocolate?
Yes. White chocolate creates a sweeter creamier version.
❓ How Long Do They Last?
They stay fresh:
- 1 week in the refrigerator
- 3 months in the freezer
❓ Can I Double the Recipe?
Definitely. Use a larger baking pan or make two batches.
🎯 Final Thoughts
These Homemade Crunch Bars are proof that simple ingredients can create unforgettable desserts.
With their crispy texture, creamy peanut butter, and rich chocolate flavor, they’re the kind of treat people request again and again. Whether you’re making them for holidays, parties, family movie nights, or late-night cravings, they always disappear fast.
Best of all, they require minimal effort while delivering maximum flavor.
Once you try this easy no-bake crunch bar recipe, you may never go back to store-bought candy bars again.
So grab your chocolate chips, peanut butter, butter, and crispy cereal — and get ready to make one of the easiest and most addictive desserts you’ll ever taste.