🥮🍯 Old Fashioned Baklava – A Classic Layered Dessert Filled with Nuts and Honey Syrup
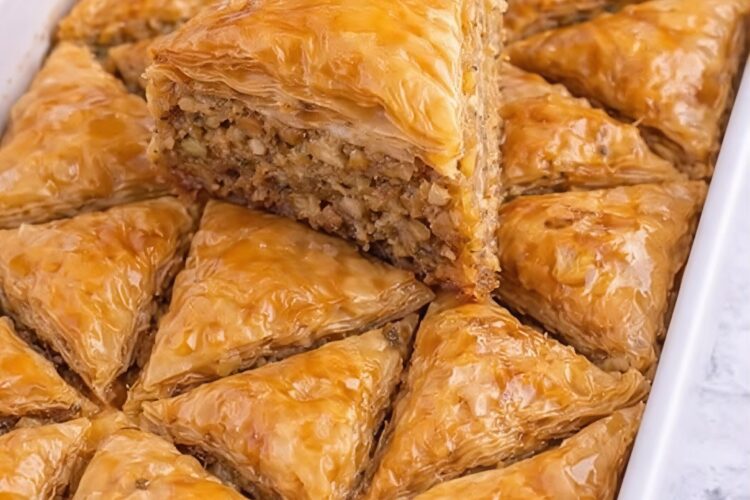
Old Fashioned Baklava is one of those timeless desserts that never goes out of style. With its delicate, flaky layers of buttery filo pastry, fragrant spiced nuts, and sweet honey syrup, baklava has delighted families and guests for generations.
Despite its impressive appearance, baklava is surprisingly easy to prepare at home. With a little patience and the right technique, you can recreate this bakery-quality dessert in your own kitchen. The result is crisp, golden layers soaked in a citrus-honey syrup that creates the perfect balance of crunch and sweetness.
Whether you’re making dessert for a holiday gathering, special dinner, or simply satisfying a sweet craving, this traditional baklava recipe delivers authentic flavor every time.
Let’s explore everything you need to know to make perfect Old Fashioned Baklava at home.
🍯 Why This Old Fashioned Baklava Recipe Is So Special
Baklava has been made for centuries, and every family seems to have its own version. This old-fashioned recipe sticks to simple ingredients and classic preparation methods that highlight texture and flavor.
Here’s why people love this recipe:
✔ Crispy, buttery layers
✔ Rich nut filling
✔ Sweet honey syrup
✔ Perfect make-ahead dessert
✔ Ideal for holidays and gatherings
✔ Beautiful presentation with minimal decoration
Baklava tastes even better the next day, making it an excellent dessert for entertaining.
🛒 Ingredients Overview
This recipe uses traditional ingredients that work together to create baklava’s signature taste and texture.
Main Ingredients
- Filo pastry dough
- Melted unsalted butter
- Finely chopped walnuts
- Cinnamon
- Sugar
- Lemon juice
- Water
- Honey
Each component plays an essential role, so using quality ingredients will noticeably improve the result.
🍴 Tools You’ll Need
Baklava doesn’t require special equipment, just standard baking tools.
- 9×13-inch baking dish
- Pastry brush
- Sharp knife
- Saucepan
- Mixing bowl
- Clean kitchen towel
- Measuring cups and spoons
A pastry brush is especially helpful for evenly coating the filo layers with butter.
👩🍳 Preparing Filo Dough Correctly
Filo pastry can seem intimidating, but it’s easy once you understand how to handle it.
Important tips:
- Thaw filo dough overnight in the refrigerator.
- Bring it to room temperature before using.
- Keep sheets covered with a slightly damp towel.
- Work quickly to prevent drying.
- Handle gently to avoid tearing.
Even if sheets tear slightly, the layers will still bake beautifully.
🥜 Preparing the Nut Filling
Walnuts are traditional in many old-fashioned baklava recipes because they add richness and slight bitterness that balances the sweetness.
Finely chop walnuts so they distribute evenly between layers.
Mix chopped walnuts with cinnamon for warm flavor throughout the dessert. Some people add a small amount of sugar to the nuts, but the syrup provides enough sweetness in this recipe.
The key is achieving small, even pieces rather than large chunks.
🧈 Layering the Baklava
Layering is where the magic happens.
Step 1: Prepare the Pan
Brush baking dish lightly with butter.
Step 2: Start Layering
Place one sheet of filo in the pan and brush with melted butter. Repeat, layering about 8 sheets.
Step 3: Add Nut Layer
Sprinkle a thin, even layer of walnut mixture.
Step 4: Continue Layers
Add 4–6 sheets of buttered filo, followed by more nuts.
Repeat until nuts are used, finishing with about 8–10 buttered filo sheets on top.
Each buttered layer helps create the crispy, flaky structure baklava is known for.
🔪 Cutting Before Baking
Always cut baklava before baking.
Using a sharp knife, cut diamond or square shapes all the way through the layers. This allows syrup to soak evenly later and makes serving easier.
Traditional diamond shapes look beautiful, but squares are perfectly acceptable and simpler.
🔥 Baking to Golden Perfection
Bake in a preheated oven at 350°F (175°C) for about 45–50 minutes, until golden brown and crisp.
Your kitchen will fill with an irresistible buttery aroma as baklava bakes.
The top should look deep golden, not pale, to ensure crisp layers.
🍯 Making the Honey Syrup
While baklava bakes, prepare syrup.
Combine sugar and water in a saucepan and bring to a gentle boil. Simmer about 10 minutes until slightly thickened.
Remove from heat and stir in honey and lemon juice.
The lemon juice prevents syrup from crystallizing while balancing sweetness.
Let syrup cool slightly before using.
🧊 The Critical Step: Pouring the Syrup
When baklava comes out of the oven, immediately pour the syrup evenly over the hot pastry.
Hot pastry + warm syrup allows perfect absorption.
You’ll hear a satisfying sizzle as syrup soaks into the layers.
Allow baklava to cool completely before serving. Overnight resting gives best results.
🧠 Tips for Perfect Baklava Every Time
Small techniques make a big difference.
✔ Butter every filo layer evenly
✔ Use sharp knife to cut clean pieces
✔ Don’t rush layering
✔ Bake until deeply golden
✔ Let baklava rest overnight
✔ Use fresh nuts for best flavor
Patience produces bakery-quality baklava.
🍋 Flavor Variations to Try
Once you master traditional baklava, try fun variations.
Pistachio Baklava
Replace walnuts with pistachios for vibrant color.
Almond Baklava
Use chopped almonds for lighter flavor.
Mixed Nut Version
Combine walnuts, pistachios, and almonds.
Orange Honey Syrup
Add orange zest to syrup for citrus twist.
Chocolate Drizzle
Light drizzle of melted chocolate adds modern touch.
Each variation offers new flavor possibilities.
🥮 Why Baklava Tastes Better the Next Day
Unlike many desserts, baklava improves over time.
As it rests, syrup distributes evenly and layers soften slightly while retaining crisp edges.
Making baklava a day ahead reduces stress and improves taste — perfect for entertaining.
🧊 Storage Tips
Baklava stores well without refrigeration.
Room Temperature
Store covered up to 5 days.
Refrigerator
Can be refrigerated but may soften slightly.
Freezer
Freeze baked baklava up to 3 months. Thaw at room temperature before serving.
It’s ideal for preparing in advance.
🍽 Serving Suggestions
Baklava pairs beautifully with warm beverages.
Try serving with:
- Coffee
- Tea
- Turkish coffee
- Mint tea
- Espresso
- Vanilla ice cream
A small square goes a long way due to richness.
❓ Frequently Asked Questions
Why is my baklava soggy?
Too much syrup or underbaking can cause sogginess.
Why are layers dry?
Not enough butter between sheets.
Can I make baklava ahead?
Yes, it’s better after resting overnight.
Can I reduce sweetness?
Use slightly less syrup or increase lemon juice.
🎉 Perfect Dessert for Celebrations
Baklava is often served during:
- Holidays
- Weddings
- Family gatherings
- Religious celebrations
- Dinner parties
- Special occasions
Its elegant appearance makes it a centerpiece dessert.
🥄 Approximate Nutrition Per Piece
Values vary by size.
- Calories: 250–300
- Fat: 15g
- Carbohydrates: 30g
- Sugar: 20g
- Protein: 3g
A small serving satisfies sweet cravings.
❤️ Why Old Fashioned Recipes Still Win
Classic recipes survive because they work. This baklava recipe uses simple ingredients, traditional layering, and proven syrup techniques that have stood the test of time.
There’s something comforting about baking desserts that generations before us enjoyed.
Sharing homemade baklava creates memorable moments around the table.
🥮 Final Thoughts: A Dessert Worth the Effort
Old Fashioned Baklava might take a little time to assemble, but the result is absolutely worth it. Crisp layers, fragrant nuts, and honey syrup create a dessert that feels luxurious yet comforting.
Once you make baklava at home, you’ll realize how achievable this impressive dessert really is. It’s perfect for sharing, gifting, and celebrating special moments.
Prepare it once, and you’ll find yourself returning to this recipe again and again.
So grab your filo dough, melt some butter, and enjoy the delicious tradition of homemade baklava. 🍯✨