🍫 Bumpy Cake – Classic Chocolate Indulgence with a Twist
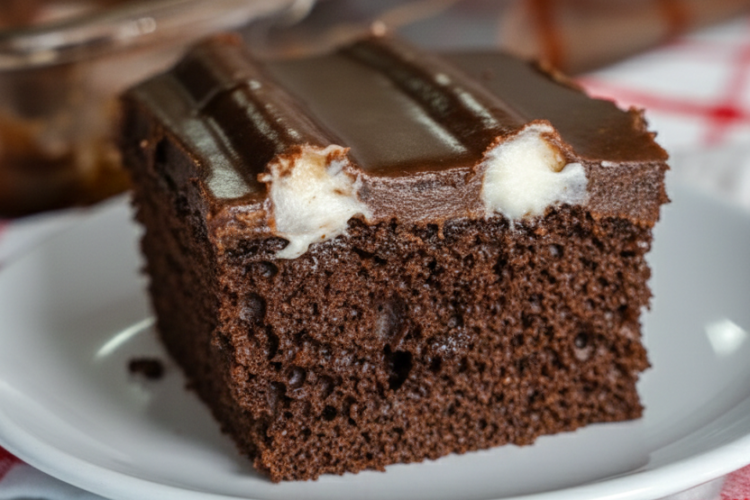
If you love rich chocolate cake with a playful texture, the Bumpy Cake is an absolute must-try. This retro dessert, beloved in bakeries for decades, features a moist devil’s food cake topped with buttery frosting and decadent fudge icing. The “bumpy” effect comes from buttercream dollops underneath the fudge layer, creating a fun, textured top that looks impressive yet is simple to make.
Perfect for birthdays, dinner parties, or just a chocolate craving, Bumpy Cake combines familiar ingredients with a unique presentation that makes it stand out on any dessert table. In this post, we’ll go through every detail to help you bake this iconic cake perfectly, while sharing tips, variations, and serving ideas.
🍰 What Is Bumpy Cake?
Bumpy Cake is a classic American dessert known for its raised bumps of buttercream frosting beneath a smooth, shiny fudge icing. Originating from bakeries in the mid-20th century, it became famous for its playful texture and rich chocolate flavor.
Unlike standard frosted cakes, the bumpy top adds dimension and fun, making it look like a professional bakery creation without complicated piping. Kids, adults, and chocolate lovers all enjoy it for its combination of moist cake, sweet buttercream, and fudgey topping.
🛒 Ingredients You’ll Need
This recipe has three main components: the cake, buttercream, and fudge icing. Using a boxed cake mix keeps it simple, but the results are bakery-quality.
Cake Ingredients:
- 1 box devil’s food chocolate cake
- Eggs, oil, and water (per box directions)
Buttercream:
- 4 tablespoons butter
- 1 ½ cups powdered sugar
- ½ teaspoon vanilla extract
- 1 tablespoon milk
- Pinch of salt
Fudge Icing:
- ½ cup buttermilk
- 2 tablespoons corn syrup
- ½ cup butter
- 2/3 cup unsweetened cocoa powder
- 3 ½ cups powdered sugar
- Pinch of salt
- ½ teaspoon vanilla extract
🍫 Why This Cake Stands Out
The magic of Bumpy Cake comes from the contrast of textures:
- Moist, rich cake forms the base
- Soft buttercream adds creaminess and shape
- Fudge icing seals in flavor and creates a shiny, chocolatey top
It’s a dessert that’s playful, indulgent, and perfect for chocolate enthusiasts who want something slightly different from a classic layer cake.
🍳 Tools Needed
You don’t need special equipment for this retro cake:
- 9×13-inch or round cake pan
- Mixing bowls
- Electric mixer or hand whisk
- Saucepan for fudge icing
- Rubber spatula
- Cooling rack
A piping bag or zip-top bag is helpful for creating buttercream dollops but optional if you use a spoon.
👩🍳 Step-by-Step Instructions
Step 1: Bake the Cake
Preheat oven according to your cake mix instructions.
Prepare the devil’s food cake using eggs, oil, and water as directed on the box.
Pour into a greased pan and bake as directed. Let cool completely before adding frosting.
Step 2: Make the Buttercream
In a medium bowl, beat together:
- 4 tablespoons butter
- 1 ½ cups powdered sugar
- ½ teaspoon vanilla extract
- 1 tablespoon milk
- Pinch of salt
Mix until smooth, creamy, and spreadable.
Step 3: Pipe or Dollop the Buttercream
Using a piping bag or spoon, place small mounds of buttercream evenly across the cake. These will create the “bumps” under the fudge icing.
Ensure bumps are evenly spaced for a consistent look.
Step 4: Make the Fudge Icing
In a saucepan, combine:
- ½ cup buttermilk
- 2 tablespoons corn syrup
- ½ cup butter
- 2/3 cup cocoa powder
Heat over medium, whisking constantly until smooth.
Remove from heat and gradually add:
- 3 ½ cups powdered sugar
- Pinch of salt
- ½ teaspoon vanilla extract
Whisk until smooth and glossy. The fudge icing should be pourable but not too runny.
Step 5: Assemble the Cake
Pour the fudge icing evenly over the cake and buttercream bumps. The icing should settle around the mounds, creating the signature bumpy effect.
Smooth edges lightly with a spatula if needed, but don’t flatten the bumps.
Step 6: Cool and Serve
Allow the cake to set for 30–60 minutes. This lets the fudge icing firm slightly.
Slice carefully to preserve the bumps and enjoy!
🍫 Tips for Perfect Bumpy Cake
✔ Cool the cake completely before frosting to prevent buttercream from melting.
✔ Use a spatula or piping bag to shape even buttercream bumps.
✔ Do not overcook fudge icing; it should be glossy and pourable.
✔ Let the icing set for at least 30 minutes for best presentation.
✔ Use room-temperature butter for smooth, creamy buttercream.
🧁 Variations to Try
Chocolate Lovers’ Dream
Add mini chocolate chips to the buttercream for extra chocolatey flavor.
Peanut Butter Twist
Use peanut butter buttercream under the fudge icing for a chocolate-peanut butter variation.
Layered Bumpy Cake
Double the recipe for two layers, adding fudge icing and buttercream between layers.
Coffee Infusion
Add 1 teaspoon instant coffee to the fudge icing for a mocha flavor.
🍰 Serving Suggestions
Bumpy Cake pairs wonderfully with:
- A scoop of vanilla ice cream
- Fresh berries for contrast
- Whipped cream for extra indulgence
- A glass of cold milk or coffee
It also works well for birthday parties, potlucks, and holiday gatherings, thanks to its playful look and rich chocolate flavor.
🥡 Storage & Shelf Life
- Room Temperature: Keep covered for 2–3 days.
- Refrigerator: Store up to 5 days, wrapped tightly to prevent drying.
- Freezer: Wrap slices individually and freeze for up to 2 months. Thaw in the fridge.
💡 Expert Tips
- Always beat buttercream until smooth for best texture.
- Use a heavy-bottomed saucepan for fudge icing to avoid scorching.
- Gradually add powdered sugar to avoid lumps.
- Evenly space buttercream bumps to maintain signature look.
- If fudge icing thickens too much, warm slightly before pouring.
❓ Frequently Asked Questions
Q: Can I make the cake from scratch?
A: Absolutely! Use your favorite chocolate cake recipe in place of the boxed mix.
Q: Can I use a different fudge icing?
A: Yes, any pourable chocolate ganache works. Adjust consistency with cream.
Q: Is Bumpy Cake kid-friendly?
A: Yes! Kids love the fun bumps and chocolate flavor.
Q: Can I prepare ahead?
A: Yes, assemble the cake and store in the fridge until serving.
🎉 Occasions Perfect for Bumpy Cake
- Birthday parties
- Holiday gatherings
- School or office celebrations
- Family dinners
- Retro-themed dessert tables
Its playful appearance makes it fun and memorable, while the chocolate keeps everyone happy.
❤️ Why Bumpy Cake Is Timeless
Bumpy Cake endures because it is:
- Fun and visually appealing
- Moist, chocolatey, and indulgent
- Simple enough for home bakers but looks professional
- Nostalgic for many families and bakery lovers
It’s a dessert that brings joy to both kids and adults, combining the classic comfort of chocolate cake with a unique presentation.
🌟 Final Thoughts
Bumpy Cake is more than just chocolate cake; it’s a retro delight that combines moist devil’s food cake, sweet buttercream, and glossy fudge icing into a memorable dessert. The signature bumps give it charm, while the layers of chocolate make it irresistible.
Whether you’re baking for a special occasion, family gathering, or just because, this cake is sure to impress with minimal effort and maximum flavor.
Gather your ingredients, preheat your oven, and enjoy a slice of nostalgic chocolate bliss – because Bumpy Cake is a dessert that never goes out of style.