✨ Wisconsin Fairy Food: The Crispy Chocolate Treat Everyone Falls in Love With
If you’ve never tasted Wisconsin Fairy Food, get ready to discover one of the Midwest’s most magical sweet treats. Light, crunchy, airy, and completely coated in chocolate, this nostalgic candy is a favorite at holidays, bake sales, family gatherings, and cozy winter kitchens across Wisconsin.
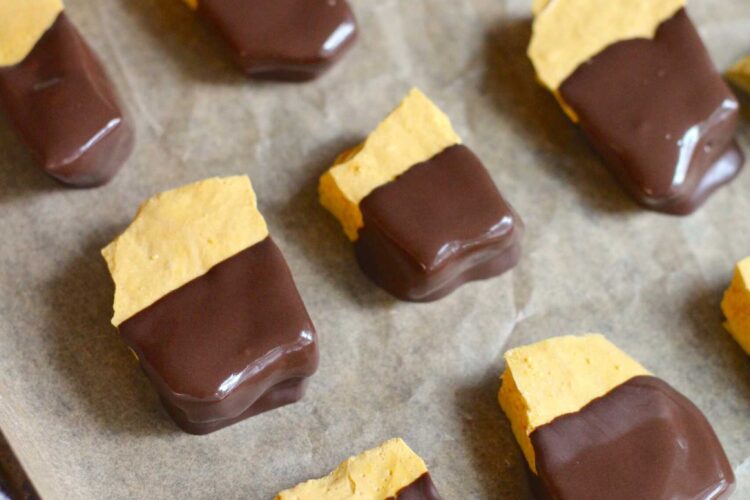
Despite its whimsical name, Fairy Food isn’t delicate — it’s bold, crunchy, and addictive. Imagine a honeycomb-like candy that shatters lightly with each bite, wrapped in smooth chocolate coating. The contrast between crispy interior and creamy chocolate exterior makes it nearly impossible to stop at just one piece.
In this guide, you’ll learn how to make authentic Wisconsin Fairy Food at home, plus tips, variations, storage advice, and secrets for perfect results every time.
Let’s make some magic.
🧁 What Is Wisconsin Fairy Food?
Wisconsin Fairy Food is a homemade candy made from a simple sugar syrup mixture that transforms into a light, crunchy foam candy when baking soda is added. The mixture bubbles dramatically, creating airy pockets throughout the candy, which hardens into crisp pieces once cooled.
Those pieces are then broken up and dipped or coated in chocolate candy coating.
The result?
• Crunchy inside
• Smooth chocolate outside
• Sweet, nostalgic flavor
• Perfect snackable candy clusters
Some people compare it to sponge candy, seafoam candy, or honeycomb candy, but Wisconsin Fairy Food has its own regional charm and tradition.
📜 Why Is It Called Fairy Food?
No one knows exactly where the name originated, but many believe the candy’s light, bubbly texture inspired the whimsical title. It looks almost magical as it foams and expands during cooking — like something straight out of a fairy tale kitchen.
In Wisconsin, families have passed down Fairy Food recipes for generations, making it a beloved holiday staple.
🛒 Ingredients You’ll Need
One of the best things about this recipe is how few ingredients are needed.
Ingredients
• 1 cup dark corn syrup
• 1 cup granulated sugar
• 1 tablespoon white vinegar
• 1 tablespoon baking soda
• 10–15 oz chocolate candy coating
That’s it. Five ingredients create candy-shop magic.
🍫 Ingredient Breakdown & Tips
Dark Corn Syrup
Gives sweetness and helps create the candy’s structure. Dark syrup adds richer flavor compared to light syrup.
Granulated Sugar
Forms the candy base.
White Vinegar
Prevents crystallization and helps create smooth candy texture.
Baking Soda
The secret ingredient. When added, it reacts with the hot sugar mixture to create thousands of air bubbles.
Chocolate Candy Coating
Melts smoothly and sets firmly, making it ideal for coating the candy pieces.
👩🍳 Step-by-Step Wisconsin Fairy Food Recipe
Step 1: Prepare Your Pan
Line a baking sheet with parchment paper or lightly grease it. Once the mixture is ready, you must pour quickly.
Step 2: Cook the Sugar Mixture
In a large saucepan, combine:
• Corn syrup
• Sugar
• Vinegar
Cook over medium heat while stirring until sugar dissolves.
Stop stirring once boiling begins and cook until the mixture reaches 300°F (hard crack stage) using a candy thermometer.
Step 3: Add Baking Soda
Remove from heat immediately.
Quickly whisk in baking soda. The mixture will foam up dramatically, increasing in volume.
Do not overmix — just combine evenly.
Step 4: Pour and Cool
Pour mixture onto prepared pan. Do not spread or press it down; let it settle naturally.
Allow candy to cool completely, about 30–45 minutes.
Step 5: Break into Pieces
Once hardened, break into bite-sized chunks using your hands or a knife.
Step 6: Melt Chocolate Coating
Melt candy coating according to package instructions, usually in microwave intervals.
Step 7: Coat the Candy
Dip or toss pieces in melted chocolate until fully coated.
Place on parchment paper to set.
Let chocolate harden completely before serving.
🧙 Tips for Perfect Fairy Food Every Time
Use a Candy Thermometer
Temperature accuracy is crucial. Too low and candy becomes sticky; too high and it burns.
Work Quickly
Once baking soda is added, time matters. Pour immediately.
Don’t Stir Too Much
Overmixing after adding baking soda collapses bubbles.
Use a Large Pot
The mixture expands rapidly and can overflow in small pans.
🎄 When Is Fairy Food Usually Made?
This candy is especially popular:
• Christmas holidays
• Winter gatherings
• Bake sales
• Family reunions
• Gift tins and treat boxes
However, it’s delicious year-round.
🍬 Flavor Variations to Try
Want to make your Fairy Food unique? Try these twists.
Peanut Butter Chocolate Fairy Food
Mix peanut butter into melted chocolate before coating.
White Chocolate Fairy Food
Use vanilla or white candy coating instead.
Sprinkle-Coated Fairy Food
Add festive sprinkles before chocolate sets.
Sea Salt Chocolate Fairy Food
Sprinkle flaky sea salt on top for sweet-salty contrast.
Caramel Drizzle Version
Drizzle caramel sauce over coated pieces.
❄️ Storage Tips
Fairy Food stores surprisingly well.
Room Temperature
Store in airtight container up to 2 weeks.
Refrigerator
Keeps fresh up to 1 month, though condensation may soften texture slightly.
Freezer
Freeze up to 2 months; thaw at room temperature.
Always keep candy dry to maintain crispness.
🎁 Perfect Homemade Gift Idea
Fairy Food makes fantastic edible gifts.
Package ideas:
• Holiday tins
• Clear gift bags
• Mason jars
• Treat boxes
Add ribbon and gift tags for professional presentation.
👨👩👧 Fun Family Activity
Kids love watching the mixture foam and grow.
Let them help:
• Break cooled candy pieces
• Dip candy in chocolate
• Add sprinkles
It’s a great weekend or holiday project.
⚠️ Common Mistakes to Avoid
Candy Too Sticky
Mixture didn’t reach correct temperature.
Candy Too Dense
Baking soda not mixed evenly.
Burnt Flavor
Temperature too high or cooked too long.
Chocolate Too Thick
Add small amount of vegetable oil to thin coating.
🧪 Why Baking Soda Creates the Magic
When baking soda hits hot sugar syrup, it releases carbon dioxide bubbles, creating foam. As candy cools, bubbles become trapped, forming crisp airy structure.
This reaction is what gives Fairy Food its signature crunch.
🌟 Why People Love Wisconsin Fairy Food
• Crunchy and light texture
• Nostalgic homemade flavor
• Simple ingredients
• Fun cooking process
• Great for gifting
• Crowd favorite at gatherings
Many people say it disappears faster than cookies or brownies at parties.
🏆 Pro Tips from Midwest Home Bakers
Longtime Fairy Food makers recommend:
• Cooking on dry days — humidity softens candy.
• Using silicone spatulas for easy cleanup.
• Making double batches for holidays.
• Storing pieces separately until gifting.
These little tricks make a big difference.
🍽️ Serving Ideas
Fairy Food is delicious on its own, but you can also use it creatively.
Try:
• Topping ice cream sundaes
• Mixing into dessert bark
• Adding to holiday snack mixes
• Crushing over cupcakes
• Serving with hot cocoa
❤️ Final Thoughts: A Magical Treat Worth Making
Wisconsin Fairy Food may sound whimsical, but one bite proves it deserves legendary status in Midwest kitchens. The combination of crispy sugar candy and smooth chocolate coating creates a treat that feels both nostalgic and exciting.
Best of all, it’s simple enough for beginners yet impressive enough to gift or serve at special gatherings.
Once you make it, chances are it will become a family tradition in your own home.
So grab your ingredients, heat up the stove, and let a little kitchen magic happen tonight.
⭐ Quick Recipe Summary
Wisconsin Fairy Food
- Cook corn syrup, sugar, and vinegar to 300°F.
- Remove from heat and whisk in baking soda.
- Pour mixture and cool.
- Break into chunks.
- Coat in melted chocolate.
- Let set and enjoy.