About This Recipe
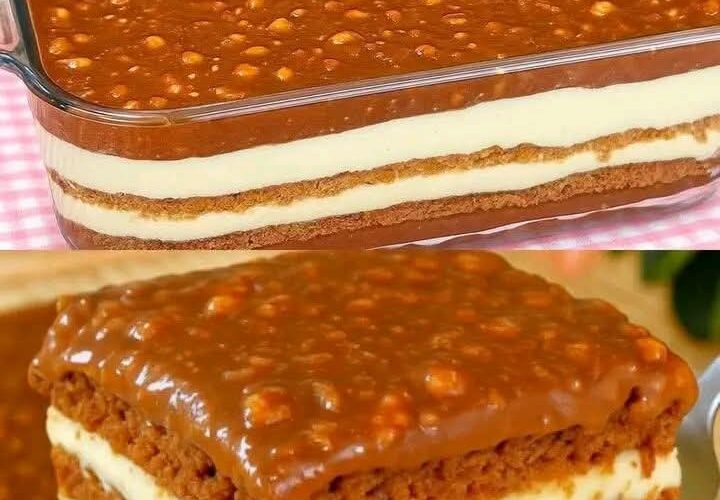
This recipe is for a layered honey cake, a dessert with historical roots in Eastern European, Central Asian, and Jewish baking traditions. Known by names such as Medovik (Russian/Ukrainian), Miodownik (Polish), or Lekach (Yiddish), the classic version is characterized by multiple thin, soft layers of honey-infused dough and a creamy filling, often sour cream-based.
This specific variation incorporates a caramel and nut component into the filling or topping, adding a contrast of textures and a deeper, more complex sweetness to the traditional profile. It is a project cake, requiring patience for assembly, but is renowned for its impressive presentation and flavor.
Why You’ll Love This Recipe
- Distinctive Flavor Profile: The warm, complex flavor of honey and spices is perfectly complemented by the buttery, nutty caramel.
- Textural Contrast: Enjoy the soft, cakey layers against the creamy filling and the crunchy toasted nuts.
- Make-Ahead Friendly: This cake actually benefits from resting for several hours or overnight, allowing the layers to soften and the flavors to meld perfectly.
- Celebration-Worthy: Its impressive, multi-layered appearance makes it a stunning centerpiece for holidays, birthdays, and special gatherings.
Ingredients
For an 8- or 9-inch cake with 8-10 layers
For the Honey Cake Layers:
- 3 cups (375g) all-purpose flour, plus more for dusting
- 1 tsp baking soda
- 1/2 tsp salt
- 2 tsp ground ginger
- 1 tsp ground cinnamon
- 1/4 tsp ground cloves (optional)
- 1/2 cup (115g) unsalted butter
- 3/4 cup (255g) honey
- 3/4 cup (150g) granulated sugar
- 3 large eggs, at room temperature
- 1 tsp vanilla extract
For the Caramel & Nut Filling/Topping:
- 1 cup (200g) granulated sugar
- 1/4 cup (60ml) water
- 1/2 cup (115g) unsalted butter, cubed
- 1 cup (240ml) heavy cream, warmed
- 1/2 tsp sea salt
- 1 1/2 cups (180g) toasted nuts (such as walnuts, pecans, or hazelnuts), roughly chopped
For the Cream Layer (e.g., Stabilized Sour Cream):
- 4 cups (950g) full-fat sour cream, cold
- 1 1/4 cups (150g) powdered sugar, sifted
- 2 tsp vanilla extract
- 1 1/2 cups (360ml) heavy cream, cold
Step by Step Instructions
- Prepare the Honey Dough: In a bowl, whisk together the flour, baking soda, salt, and spices. In a saucepan over medium heat, combine the butter, honey, and sugar. Heat, stirring frequently, until the butter melts and the sugar dissolves. Do not boil. Remove from heat and let cool for 5 minutes. Gradually whisk the warm honey mixture into the dry ingredients. Whisk in the eggs one at a time, then the vanilla, until a soft, sticky dough forms. Cover and refrigerate for at least 1-2 hours until firm enough to handle.
- Shape and Bake the Layers: Preheat oven to 350°F (175°C). Divide the chilled dough into 8-10 equal pieces. On a well-floured surface, roll each piece into a very thin circle (about 8-9 inches in diameter), using a plate as a guide to trim edges neatly. Prick each circle all over with a fork. Transfer carefully to a parchment-lined baking sheet. Bake for 5-7 minutes each, or until the edges are just golden brown. They will be soft but will firm up as they cool. Let cool completely on the pan. Repeat with all pieces.
- Make the Caramel Sauce with Nuts: In a heavy-bottomed saucepan, combine the sugar and water. Cook over medium heat, without stirring, until the sugar dissolves and turns a deep amber color. Carefully whisk in the cubed butter (it will bubble vigorously) until melted. Slowly pour in the warm heavy cream while whisking constantly until smooth. Remove from heat, stir in the sea salt and 1 cup of the toasted nuts. Let the caramel cool completely and thicken to a spreadable consistency.
- Make the Stabilized Cream Filling: Using an electric mixer, beat the cold sour cream with powdered sugar and vanilla until smooth. In a separate, clean bowl, whip the cold heavy cream to stiff peaks. Gently fold the whipped cream into the sweetened sour cream base until no streaks remain.
- Assemble the Cake: Place one cake layer on a serving plate. Spread a thin, even layer of the sour cream filling over it. Place a second cake layer on top and spread with a thin layer of the cooled caramel-nut mixture. Alternate between the two fillings as you stack the layers, ending with a cake layer on top. Reserve some caramel and nuts for final decoration. Use any remaining cream filling to cover the top and sides of the cake in a thin “crumb coat.”
- Frost and Decorate: Apply the remaining cream filling to fully frost the cake. Drizzle the reserved caramel sauce over the top and sprinkle with the remaining chopped toasted nuts. Gently press some nuts onto the sides if desired.
- Rest the Cake: This is a crucial step. Refrigerate the assembled cake for at least 8 hours, or preferably overnight. This allows the moisture from the fillings to soften the cake layers, resulting in a perfectly tender, sliceable cake.
FAQ
Can I make the components ahead of time?
Yes. The baked cake layers can be stored in an airtight container at room temperature for 2 days or frozen for a month. The caramel sauce can be made and refrigerated for up to a week; gently reheat it to make it spreadable. The cream filling should be made the day you assemble the cake.
My cake layers came out hard and crisp. Did I do something wrong?
No, this is normal. The baked layers are meant to be crisp. The essential magic of this cake happens during the long rest in the refrigerator. The moisture from the fillings will gradually be absorbed by the layers, transforming them from crisp and cookie-like to soft and cakey.
What’s the best way to cut neat slices?
Use a long, thin-bladed knife. Dip the blade in very hot water and wipe it clean with a towel between each cut. This will slice through the caramel and creamy layers cleanly for professional-looking portions.
Can I use a different filling?
While caramel and nuts are a classic pairing for honey cake, traditional fillings often use just sweetened sour cream or whipped cream. You can omit the caramel and simply use the stabilized cream filling between every layer, or add a layer of fruit preserves.
You Must Know
The Resting Period is Non-Negotiable: Do not skip the 8+ hour refrigeration after assembly. This is not just for chilling; it is the final cooking step where the textures harmonize. Cutting into the cake too early will result in separate, distinct layers that haven’t melded.
Controlling the Caramel: When making the caramel sauce, watch the color closely. It should be a deep amber, but not dark brown or smoking, which indicates bitterness. Adding the cream while both are warm helps prevent the sugar from seizing.
Even Layers are Key: Taking the time to roll each dough piece to the same thickness and diameter ensures the cake stacks evenly and each bite has a consistent texture. Using a guide (like a plate or cake pan bottom) to trim the edges is highly recommended.
Storage Tips
- Refrigeration: Due to the dairy-based fillings, this cake must be stored in the refrigerator. Keep it covered with a cake dome or in an airtight container. It will keep well for 3-4 days, and many find the flavor improves on the second day.
- Freezing: You can freeze the fully assembled and frosted cake. Place it uncovered in the freezer until solid, then wrap it tightly in several layers of plastic wrap and foil. Freeze for up to 1 month. Thaw overnight in the refrigerator before serving.
- Storing Components: Unused baked cake layers can be stored at room temperature in an airtight container for several days or frozen for longer storage. Caramel sauce can be stored in a sealed jar in the refrigerator for 1-2 weeks.