🌮 Walking Taco Casserole 🤤
Don’t LOSE This Recipe 😋 — A Crowd-Pleaser You’ll Make Again and Again!
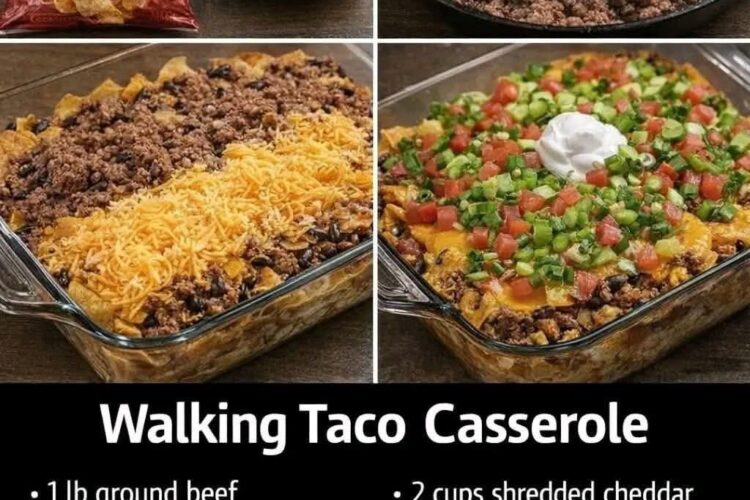
If you love the bold, crunchy, cheesy goodness of a classic walking taco, this Walking Taco Casserole will steal your heart. It takes everything you adore about tacos—seasoned beef, zesty salsa, creamy sour cream, melty cheese, and crunchy chips—and transforms it into one comforting, oven-baked dish that’s perfect for busy weeknights, potlucks, game days, or family gatherings.
Easy, fun, and endlessly customizable, this casserole is pure comfort with a Tex-Mex twist.
✨ If you love recipes like this and want me to keep sharing them, please show some love and save this recipe. Thank you! ✨
⭐ The Full Recipe is right here — don’t miss it! 👇
🛒 Ingredients
Main Ingredients
- 1 lb ground beef
- 1 packet taco seasoning
- 1 cup salsa (mild, medium, or hot)
- 1 can (15 oz) black beans, drained and rinsed
- 1 can (15 oz) corn, drained
- 1 cup sour cream
- 2 cups shredded cheddar or Mexican blend cheese
- 1 bag Fritos or Doritos, crushed
Optional Toppings (Highly Recommended!)
- Diced tomatoes
- Green onions (sliced)
- Jalapeños
- Shredded lettuce
- Extra sour cream
- Guacamole or avocado slices
👩🍳 Instructions (Step-by-Step)
- Preheat the Oven
Preheat your oven to 375°F (190°C) and lightly grease a 9×13-inch baking dish. - Cook the Ground Beef
In a large skillet over medium heat, cook the ground beef until browned and fully cooked. Drain excess grease. - Season the Meat
Add the taco seasoning and a splash of water (according to the packet instructions). Stir well and simmer for 2–3 minutes until thick and flavorful. - Add the Mix-Ins
Stir in the salsa, black beans, and corn. Cook for another 2–3 minutes, then remove from heat. - Layer the Casserole
- Spread half of the crushed Fritos or Doritos in the bottom of the baking dish.
- Spoon the beef mixture evenly over the chips.
- Dollop sour cream over the top and gently spread.
- Sprinkle generously with shredded cheese.
- Add the remaining crushed chips on top.
- Bake
Bake uncovered for 20–25 minutes, or until the cheese is melted, bubbly, and lightly golden. - Rest & Serve
Let the casserole rest for 5 minutes. Add your favorite toppings just before serving.
🍽️ Methods & Cooking Tips
- Crunch Control: Add some chips on top after baking if you love extra crunch.
- Spice Level: Use spicy salsa, hot taco seasoning, or jalapeños for heat lovers.
- Protein Swap: Ground turkey or chicken works great as a lighter option.
- Make-Ahead Friendly: Assemble ahead of time and bake when ready.
📜 History of the Walking Taco
The walking taco originated as a fun, portable snack often served at fairs, sports events, and school games. Traditionally made by opening a small bag of chips and filling it with taco meat and toppings, it earned its name because you could eat it “on the go.”
This casserole version was born from the desire to turn that handheld favorite into a family-style comfort meal, keeping the flavor but making it oven-ready and shareable.
🧩 Formation & Why It Works
The magic of this casserole lies in its layers:
- Crunchy base from the chips
- Savory, seasoned beef packed with flavor
- Creamy elements that balance spice
- Melty cheese that brings everything together
Each bite delivers texture, richness, and bold Tex-Mex taste.
❤️ Who Will Love This Recipe?
- Taco lovers 🌮
- Busy families
- Kids and teens
- Potluck and party hosts
- Anyone who loves comfort food with a crunch
🔁 More Methods You Can Try
- Slow Cooker Version: Cook beef first, then layer everything and heat on low for 2–3 hours.
- Skillet Version: Skip the oven and finish with a lid on the stove until cheese melts.
- Vegetarian Style: Replace beef with seasoned beans or meatless crumbles.
🌟 Conclusion
This Walking Taco Casserole is simple, satisfying, and guaranteed to disappear fast. It’s bold, cheesy, crunchy, and comforting—everything a great recipe should be. Whether it’s a weeknight dinner or a weekend gathering, this dish brings smiles to the table every time.