Introduction
The No-Bake Cherry Cheesecake is a timeless, effortless dessert that delivers all the creamy richness and tangy sweetness of traditional cheesecake without ever turning on the oven—making it perfect for warm weather, busy schedules, or beginner bakers. With its buttery graham cracker crust, velvety smooth cream cheese filling lightened by freshly whipped cream, and glossy crown of cherry pie filling, this dessert strikes an irresistible balance of textures and flavors that feels both indulgent and refreshingly light. Requiring only a handful of ingredients and minimal equipment, it comes together quickly and chills to perfection, offering classic American diner-style charm in every slice. This recipe embodies the joy of simple, crowd-pleasing sweets that look impressive yet demand little effort. As we explore this beloved no-bake classic, we’ll uncover its origins, cultural significance, detailed ingredients, variations, expert tips, precise instructions, sensory description, nutrition, and why it perfectly represents healthful indulgence.
Origin and Cultural Significance
No-bake cheesecakes emerged in mid-20th-century America as a clever adaptation of New York’s famous creamy baked cheesecake, designed to avoid the long baking and cooling times that could be daunting or impractical in hot kitchens. The invention of packaged cream cheese by Philadelphia in the late 1800s laid the groundwork, but the no-bake version surged in popularity during the 1950s and 1960s with the rise of convenience foods like Jell-O gelatin mixes and canned pie fillings. Early recipes often used gelatin or condensed milk to set the filling, but the modern whipped cream method—featured here—gained traction in the 1970s and 1980s through community cookbooks and magazine features, offering a lighter, airier texture reminiscent of French mousses.
Culturally, cherry-topped no-bake cheesecake became an icon of American home baking and diner culture, frequently appearing on restaurant menus alongside milkshakes and apple pie. The bright red cherry topping evokes nostalgic soda fountain aesthetics, while the graham cracker crust ties it to s’mores and summer picnics. It remains a staple at potlucks, holiday gatherings, and family celebrations because of its make-ahead convenience and universal appeal—kids love the sweetness, adults appreciate the creaminess. Globally, similar chilled cheesecakes exist in variations like Australian unrefrigerated versions or Japanese rare cheesecakes, but the American cherry-topped style stands out for its bold flavors and ease. Today, it thrives on social media as a “viral” dessert for its photogenic layers and simplicity, proving that classic comfort never goes out of style.
Ingredients Quantity
This No-Bake Cherry Cheesecake serves 8 generously in a standard 9-inch pie plate, with balanced proportions for a sturdy crust and luscious filling.
For the Graham Cracker Crust:
- 1 ¼ cups graham cracker crumbs (about 10-12 full graham cracker sheets, finely crushed)
- ¼ cup unsalted butter, melted (salted works if that’s what you have; adjust added sugar slightly)
- ¼ cup white granulated sugar
For the Creamy Filling:
- 1 (8-ounce) package full-fat cream cheese, softened to room temperature (Philadelphia brand recommended for best texture)
- 1 cup powdered sugar (confectioners’ sugar, sifted if lumpy)
- 1 teaspoon pure vanilla extract
- 1 cup cold heavy whipping cream (or heavy cream; must be at least 35% fat for proper whipping)
For the Topping:
- 1 (21-ounce) can cherry pie filling (Comstock or Duncan Hines are reliable; approximately 12.5-21 oz depending on brand—use one standard can)
These exact measurements ensure a crisp crust that holds its shape, a silky filling that sets firmly, and a generous fruity topping.
Optional Additions
The classic cherry version is perfection, but optional additions allow endless customization while preserving the no-bake ease.
Swap the cherry pie filling for blueberry, strawberry, lemon curd, or fresh fruit compote. For a chocolate twist, mix ¼ cup cocoa powder into the crust or drizzle melted chocolate over the set cheesecake. Add lemon or orange zest to the filling for citrus brightness. Incorporate crushed Oreos or gingersnaps into the crust for variety. For extra decadence, fold in mini chocolate chips or toffee bits. Lighter options include reduced-fat cream cheese and whipped topping (like Cool Whip) instead of fresh cream—though texture suffers slightly. Garnish with whipped cream rosettes, chocolate shavings, or toasted nuts. These variations keep the dessert versatile for seasons and preferences.
Tips for Success
Achieving a flawless No-Bake Cherry Cheesecake relies on a few key techniques to ensure the crust holds and the filling sets beautifully.
Use full-fat cream cheese and real heavy cream for the richest flavor and firmest set—low-fat versions can become watery or soft. Soften cream cheese fully at room temperature (about 1 hour) to avoid lumps. Crush graham crackers finely and evenly; a food processor works best, but a zip-top bag and rolling pin does the job. Press the crust firmly and evenly with the bottom of a measuring cup for clean edges and no crumbling when sliced. Chill the mixing bowl and beaters before whipping cream for faster, sturdier peaks—stop at soft peaks to prevent graininess when folding. Fold gently with a spatula using a figure-eight motion to maintain airiness. Chill at least 3 hours, preferably overnight, for clean slices. Cover loosely with plastic wrap to prevent absorbing fridge odors. Serve chilled directly from the refrigerator for best texture. These tips guarantee professional results with minimal effort.
Instructions
Follow these clear, step-by-step instructions for perfect No-Bake Cherry Cheesecake—total hands-on time is about 20 minutes, plus chilling.
Prepare the Crust: In a medium bowl, stir together 1 ¼ cups graham cracker crumbs, ¼ cup melted unsalted butter, and ¼ cup white sugar until the mixture resembles wet sand and holds together when squeezed. Pour into a 9-inch pie plate and press firmly across the bottom and up the sides using your fingers or the flat bottom of a measuring cup. Place the crust in the refrigerator to chill while preparing the filling.
Make the Filling: In a large mixing bowl, beat the softened 8-ounce package of cream cheese with an electric mixer on medium speed until smooth and creamy, about 1 minute. Add 1 cup powdered sugar and 1 teaspoon vanilla extract, beating until fully incorporated and fluffy, scraping down the sides as needed.
In a separate chilled bowl, beat 1 cup cold heavy whipping cream with clean beaters on medium-high speed until soft peaks form (when lifted, the cream holds gentle curls)—about 2-3 minutes; do not overwhip. Using a rubber spatula, gently fold the whipped cream into the cream cheese mixture in three additions until smooth and uniform, taking care not to deflate the air.
Assemble & Chill: Remove the crust from the refrigerator and spoon the filling into it, smoothing the top with an offset spatula or the back of a spoon for an even surface. Cover loosely with plastic wrap and refrigerate for at least 2-3 hours, or preferably overnight, until firmly set.
Finish & Serve: Once set, spread the entire can of cherry pie filling evenly over the top, allowing some to drip slightly down the sides for visual appeal. Slice with a sharp knife dipped in hot water for clean cuts, and serve chilled.
Description
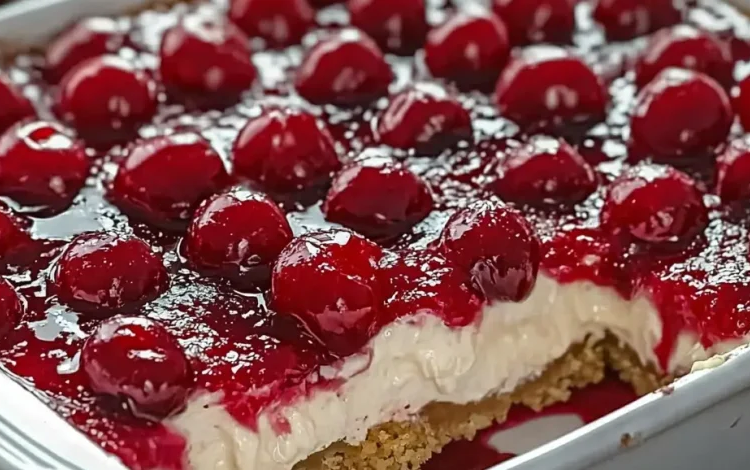
No-Bake Cherry Cheesecake presents as a stunning layered beauty: a golden, buttery graham cracker crust cradling a tall, snowy-white filling that’s silky and mousse-like, crowned with glossy, ruby-red cherries that glisten invitingly. The contrast of matte crust, creamy filling, and shiny topping makes every slice photogenic and appetizing.
Texturally, it’s pure delight—the crust offers crisp crumbly bite, the filling melts luxuriously on the tongue with airy lightness from whipped cream, and the cherries provide juicy bursts against the tangy-sweet creaminess. Flavor-wise, it’s harmoniously balanced: buttery graham notes, rich yet bright cream cheese tang, subtle vanilla warmth, and vibrant sweet-tart cherry finish. Cool and refreshing yet deeply satisfying, it evokes summer picnics and holiday joy in every forkful—elegant enough for company, comforting enough for everyday treats.
Nutritional Information
This No-Bake Cherry Cheesecake offers classic dessert indulgence with moderate portions providing satisfaction. Approximate values per serving (based on 8 servings using full-fat ingredients):
Calories: 450-550 per serving. Fat: 30-35g (mostly saturated from cream cheese and butter). Carbohydrates: 45-50g (primarily from sugar and crust). Protein: 5-6g. Sugars: 35-40g (from powdered sugar and pie filling).
It provides calcium from dairy and small amounts of vitamin A. While rich, it’s portion-controlled and contains no eggs or artificial stabilizers. Lighten with reduced-fat cream cheese, less sugar, or fresh fruit topping. Enjoy occasionally as part of balanced eating—its no-bake ease encourages mindful serving sizes.
Conclusion and Recommendation
In conclusion, the No-Bake Cherry Cheesecake captures the essence of effortless elegance—delivering bakery-worthy results with pantry staples and zero baking, making it a timeless favorite across generations.
I wholeheartedly recommend this dessert for any occasion: summer gatherings, holidays, potlucks, or simple weeknight treats. Its foolproof nature and universal appeal make it essential; prepare it once, and it will become your go-to showstopper.
Embracing Healthful Indulgence
Embracing healthful indulgence with No-Bake Cherry Cheesecake means savoring creamy richness mindfully—the real dairy provides satisfying fats that curb cravings, while portion control keeps it balanced. Using quality ingredients and fresh whipped cream elevates simple pleasure without excess. In a world of complicated desserts, this recipe celebrates joy in moderation: cool, luscious slices that nourish the spirit as much as the body. Make it regularly for happy, balanced sweet moments.